- Science Toys
- Magnetism
- Electromagnetism
- Electrochemistry
- Radio
- Thermodynamics
- Aerodynamics
- Light and optics
- Simple laser communicator
- Make your own 3D pictures
- Making permanent rainbows.
- A solar powered marshmallow roaster
- Make a spectroscope from a CD.
- The impossible kaleidoscope
- Make a solar hotdog cooker
- Exploring invisible light
- A high resolution spectrograph.
- Time-lapse photography.
- High speed photography.
- Stacking photos for high depth of field.
- Biology
- Mathematics
- Computers and Electronics
The Plastic Hydrogen Bomb
It sounds like the perfect terrorist weapon, but it is a toy that teaches the principles of electrochemistry. It's also a high-tech squirt gun. The Plastic Hydrogen Bomb uses electricity to break apart water molecules into hydrogen and oxygen. Then it uses a spark of electricity to explosively recombine the gases into high pressure steam, which propels a stream of water high into the air. The construction is a little more difficult than the other toys in this book, but the skills learned by building this toy can be put to good use building many other devices and works of art.Scrounging for bomb making materials.
The bomb is made from these materials:- Polyester resin and catalyst. This can be found at hobby stores and hardware stores.
- Two carbon rods from cheap batteries (or large gold plated connectors)
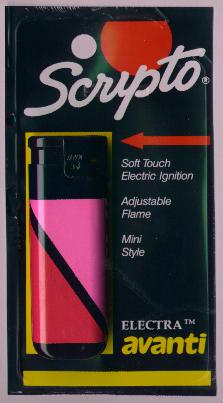
- A Piezo-electric ignitor from a Scripto electronic lighter
- A 9 volt battery clip
- Paraffin (from a cheap white candle)
- Insulated copper wire (about 20 to 22 guage)
- Solder
How the bomb works.
In schematic form, the bomb looks like this: The 9 volt battery is connected to the carbon rods, which are
under water in the bomb chamber. The water breaks up into
hydrogen and oxygen, which is trapped in the upper half of the
chamber. The piezo-electric ignitor from the electronic lighter
is pushed, which causes a spark to jump the spark gap, which
ignites the hydrogen and oxygen. The resulting high pressure
steam forces the water out through the exit tubes, high into
the air.
The 9 volt battery is connected to the carbon rods, which are
under water in the bomb chamber. The water breaks up into
hydrogen and oxygen, which is trapped in the upper half of the
chamber. The piezo-electric ignitor from the electronic lighter
is pushed, which causes a spark to jump the spark gap, which
ignites the hydrogen and oxygen. The resulting high pressure
steam forces the water out through the exit tubes, high into
the air.
The first few attempts at constructing the bomb.
The first bomb I built was done entirely with the "lost wax casting" method used by artists, sculptors, and jewelers. In the lost wax method, a model of the finished object is made of wax, then plaster is poured over the wax and allowed to harden. Finally, the wax is melted out of the hardened plaster, and the hollow is filled with molten metal, which cools into the same shape as the original wax model. The plaster is broken away, and the finished piece of art or jewelry is cleaned and polished. With the bomb, we eliminate all of the steps after the wax has been melted out of the mold, since our objective is to build a hollow in the plastic into which the carbon rods and spark gap protrude. The first bomb is shown below: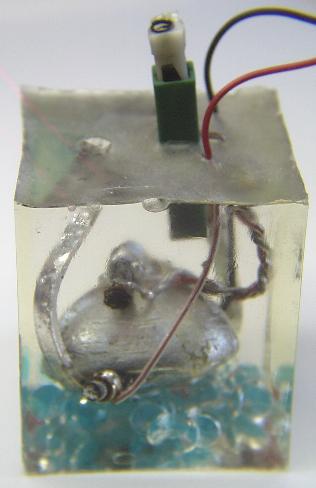 Note that the spark gap at the top of the bomb is made out of
carbon rods. Later versions use a simpler spark gap made of
copper wire.
You can see the red wire from the battery clip
going to the carbon rod at the bottom of the hemispherical
chamber. You can also see a rectangular tube curving up from
the bottom of the chamber and exiting out the top of the
device. This tube was formed from a thin sheet of wax, and is
there to let the water in and out of the chamber. There is
another tube like it on the other side. The blue at the bottom
is a pile of plastic beads that the wax model was sitting on when
the liquid plastic was poured over it.
The problem with the lost wax version is that you can't see
the inner workings very well. My next attempt used a clear plastic
box and some clear plastic tubing. It exploded in my face on the
first attempt to use it. The remains are shown below.
Note that the spark gap at the top of the bomb is made out of
carbon rods. Later versions use a simpler spark gap made of
copper wire.
You can see the red wire from the battery clip
going to the carbon rod at the bottom of the hemispherical
chamber. You can also see a rectangular tube curving up from
the bottom of the chamber and exiting out the top of the
device. This tube was formed from a thin sheet of wax, and is
there to let the water in and out of the chamber. There is
another tube like it on the other side. The blue at the bottom
is a pile of plastic beads that the wax model was sitting on when
the liquid plastic was poured over it.
The problem with the lost wax version is that you can't see
the inner workings very well. My next attempt used a clear plastic
box and some clear plastic tubing. It exploded in my face on the
first attempt to use it. The remains are shown below.
 The plastic
box was not strong enough to contain the force of the explosion,
and the plastic tubes were too narrow and too long to let the water
out fast enough to prevent the plastic from being blown apart.
However, the new spark gap, made of twisted copper wire, worked
perfectly.
In succeeding refinements, the plastic box is completely covered
with the polyester resin, so that the walls of the chamber are
at least a half inch thick. The entry/exit tubes are drilled
into the plastic, so they are straight and wide. A little bit
of lost wax technology is used to provide a target for the
drill, and so the wax can support the carbon rods and spark gap.
The plastic
box was not strong enough to contain the force of the explosion,
and the plastic tubes were too narrow and too long to let the water
out fast enough to prevent the plastic from being blown apart.
However, the new spark gap, made of twisted copper wire, worked
perfectly.
In succeeding refinements, the plastic box is completely covered
with the polyester resin, so that the walls of the chamber are
at least a half inch thick. The entry/exit tubes are drilled
into the plastic, so they are straight and wide. A little bit
of lost wax technology is used to provide a target for the
drill, and so the wax can support the carbon rods and spark gap.
Construction details
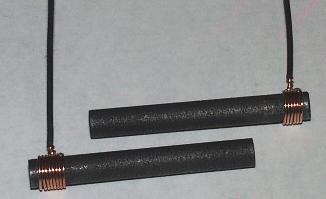
Construction starts with the removal of two carbon rods from a couple of old fashioned carbon-zinc batteries. These are the cheap type, such as the Eveready 'Classic' or Radio Shack 'Heavy Duty' types, not the alkaline batteries that have largely replaced them in common use. In the photo below one of the batteries has the cover and top removed to show the carbon rod sticking up out of the cardboard seal. A little twist and pull and the rod slips right out, and can be washed and used.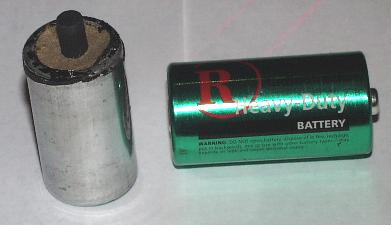 Next we attach insulated copper wire to the carbon rods by
stripping the insulation off of a few inches of the wire on
one end, and winding several turns around the rod, to make
a good connection. The wire is tightly twisted to hold the
connection securely.
Next we attach insulated copper wire to the carbon rods by
stripping the insulation off of a few inches of the wire on
one end, and winding several turns around the rod, to make
a good connection. The wire is tightly twisted to hold the
connection securely.
 The spark gap is made by bending the insulated copper wire
around a pencil, then twisting the ends tightly for a couple
of inches. The loop is then cut, and some of the insulation
trimmed from the ends.
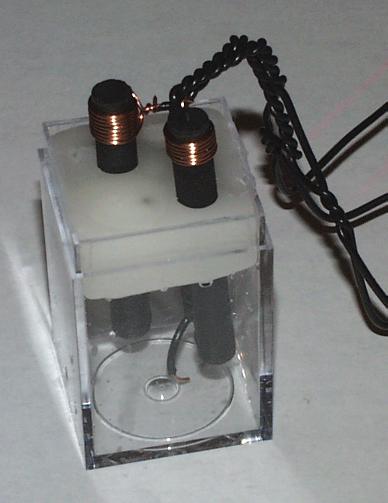
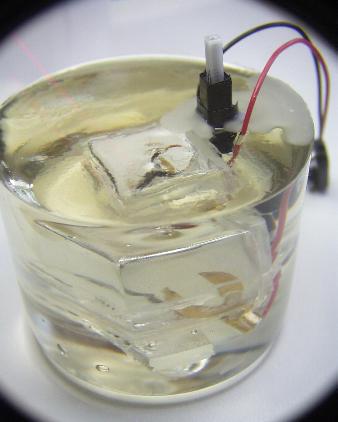
The spark gap and the carbon rods are then placed in the clear
plastic box (the box from Tic-Tac candies will do if you don't
have a cubical box as in the photo). The box is filled with water
up to about a half of an inch from the top. Then melted wax is
poured on top of the water to seal the box and the spark gap and
rods. When the wax has hardened, it can be loosened a little to
let the water out, then replaced to seal the box.
The spark gap is made by bending the insulated copper wire
around a pencil, then twisting the ends tightly for a couple
of inches. The loop is then cut, and some of the insulation
trimmed from the ends.
The spark gap and the carbon rods are then placed in the clear
plastic box (the box from Tic-Tac candies will do if you don't
have a cubical box as in the photo). The box is filled with water
up to about a half of an inch from the top. Then melted wax is
poured on top of the water to seal the box and the spark gap and
rods. When the wax has hardened, it can be loosened a little to
let the water out, then replaced to seal the box.
 Now we attach two thick pieces of wax to the bottom that will
form hollow channels to let the water in and out. If you like,
you can extend these all the way up to the top, making channels
of square cross section. I like to drill the channels later,
but you might like challenging people to guess how you drilled
square holes in the plastic.
Now we attach two thick pieces of wax to the bottom that will
form hollow channels to let the water in and out. If you like,
you can extend these all the way up to the top, making channels
of square cross section. I like to drill the channels later,
but you might like challenging people to guess how you drilled
square holes in the plastic.
 The next step is to take apart the
electronic lighter
to get the piezo-electric ignitor.
The next step is to take apart the
electronic lighter
to get the piezo-electric ignitor.
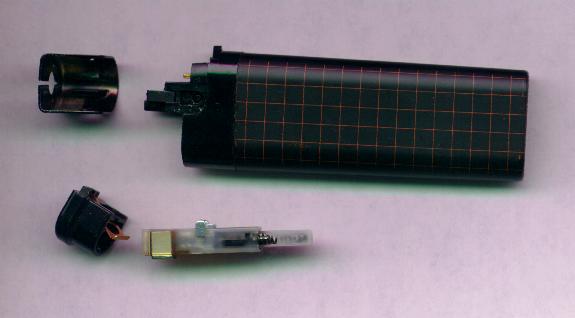 The ignitor is the little gadget that produces a spark
when it is pushed down. It has two contacts that need to
be roughened with a knife or sandpaper before the spark gap's
wires can be soldered to them.
The ignitor is the little gadget that produces a spark
when it is pushed down. It has two contacts that need to
be roughened with a knife or sandpaper before the spark gap's
wires can be soldered to them.
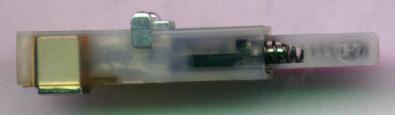 The larger lighters used for lighting fireplaces have larger
ignitors that are easier to solder.
The larger lighters used for lighting fireplaces have larger
ignitors that are easier to solder.
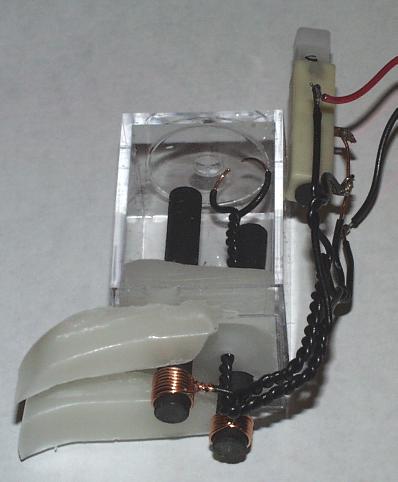
 You can see the larger ignitor is soldered to the spark gap
in the photo of the box on its side a few photos earlier. The
wires to the 9 volt battery clip are also soldered to the wires
that go to the carbon rods.
The casting of the polyester resin is done in three steps.
A tupperware bowl was used for the mold.
The first casting is a thin layer on the bottom of the bowl.
This layer is allowed to harden, to be a base on which to sit
the carbon rods and the rest of the apparatus.
The next casting layer is a half of an inch thick, and holds the
carbon rods in place, and covers the wax outriggers at the bottom
of the box. This layer is also allowed to harden before the
last layer is poured. This ensures that the hollow box will not
float to the top of the mold when the last layer is poured.
The last layer is then poured, and should completely cover the
top of the box to a thickness of at least a half of an inch. It
will also cover the soldered connections on the piezo-electric
ignitor, but must not touch the moving parts or get inside
the ignitor, or the ignitor will be stuck and not operate.
You can see the larger ignitor is soldered to the spark gap
in the photo of the box on its side a few photos earlier. The
wires to the 9 volt battery clip are also soldered to the wires
that go to the carbon rods.
The casting of the polyester resin is done in three steps.
A tupperware bowl was used for the mold.
The first casting is a thin layer on the bottom of the bowl.
This layer is allowed to harden, to be a base on which to sit
the carbon rods and the rest of the apparatus.
The next casting layer is a half of an inch thick, and holds the
carbon rods in place, and covers the wax outriggers at the bottom
of the box. This layer is also allowed to harden before the
last layer is poured. This ensures that the hollow box will not
float to the top of the mold when the last layer is poured.
The last layer is then poured, and should completely cover the
top of the box to a thickness of at least a half of an inch. It
will also cover the soldered connections on the piezo-electric
ignitor, but must not touch the moving parts or get inside
the ignitor, or the ignitor will be stuck and not operate.
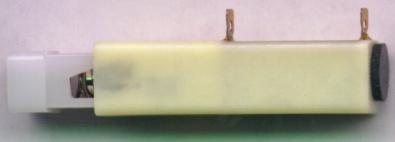
 The penultimate step is drilling the entry and exit holes. I use a 1/4
inch drill bit. Finally, the wax is melted out by placing the
project in a warm oven (no more than 150 degrees Fahrenheit), in a
pan on top of newpapers to catch the melted wax.
You can see the results in the photo above.
The penultimate step is drilling the entry and exit holes. I use a 1/4
inch drill bit. Finally, the wax is melted out by placing the
project in a warm oven (no more than 150 degrees Fahrenheit), in a
pan on top of newpapers to catch the melted wax.
You can see the results in the photo above.
A slight variation
The carbon rods are used because they will not disintegrate when the electric current is run through the water. If we used copper wire, one wire would be eaten away, and the other would get a plating of copper sludge on it that was removed from the other wire. However, if we use a less reactive metal, such as gold, this destruction of the wire will take place much more slowly, and the toy can be used many times without any noticeable changes. To test this, I made a bomb of design similar to the one we just made, but using some gold plated connectors used for high end stereo connections.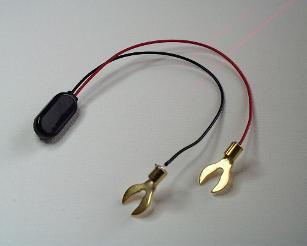 The result is a nice looking bomb:
Operating the bomb.
To operate the toy, hold it under a faucet, tilted so that water can enter one hole and air can exit the other. The chamber should be only about half full, with a bubble of air keeping the spark gap dry. Plug in a 9 volt battery, and watch as tiny bubbles of hydrogen and oxygen form on the carbon rods (or gold electrodes). After about 15 to 20 minutes, enough of the gases will have formed for the bomb to explode with a nice effect. Note that as the gases form, the water is displaced, and leaks out the drilled holes. Hold the bomb at arm's length, and press the ignitor down until it clicks. The water remaining in the bomb and the tubes will shoot out, covering the ceiling and spectators. Some years ago I was demonstrating my science toys on a television show. Before the show began taping, we filled a bomb and plugged in the battery. After describing and demonstrating other toys for about 25 minutes, it was almost time to go. I held the bomb in my hands, and clicked on the ignitor, but nothing happened. I clicked a few more times, muttering something about the spark gap being wet. The host of the show decided to give it a try. He held the bomb, and carefully looked down the tubes as he clicked the ignitor. Of course it worked for him. The water splashed up into his glasses, his hair, his shirt, the ceiling, all over. The camera crew were laughing so hard you could see the camera shaking. Be very careful with bombs.Why does it do that?
Using electricity to break up water is called electrolysis (Greek for 'loosening by electricity'). Water is made up of two atoms of hydrogen and one atom of oxygen. In the liquid form, the molecules are constantly breaking up into electrically charged pieces, and then getting back together. The electrically charged pieces are called ions. Water breaks up into ions by losing one of the hydrogen atoms. The nucleus of the hydrogen atom breaks away, leaving its electron behind, with the other two atoms. Thus we have a positively charged hydrogen ion H+, and a negatively charged hydroxyl ion, OH-. One of the carbon rods is attached to the negative terminal of the battery, and has excess electrons. This electrode is called the cathode. The excess electrons attract the positively charged hydrogen atoms to the cathode. Two of the electrons on the cathode combine with two H+ ions, forming a hydrogen molecule H2. This molecule joins others and forms bubbles of hydrogen gas that rise through the water, making room for more water to contact the cathode and form more hydrogen. The reaction at the cathode is described chemically as:- 2H+ + 2e- --> H2
- 4 OH- --> 4e- + 2H2O + O2
- Science Toys
- Magnetism
- Electromagnetism
- Electrochemistry
- Radio
- Thermodynamics
- Aerodynamics
- Light and optics
- Simple laser communicator
- Make your own 3D pictures
- Making permanent rainbows.
- A solar powered marshmallow roaster
- Make a spectroscope from a CD.
- The impossible kaleidoscope
- Make a solar hotdog cooker
- Exploring invisible light
- A high resolution spectrograph.
- Time-lapse photography.
- High speed photography.
- Stacking photos for high depth of field.
- Biology
- Mathematics
- Computers and Electronics
Some of my other web sites:

Send mail to Simon Quellen Field via sfield@scitoys.com