
- Science Toys
- Magnetism
- Electromagnetism
- Electrochemistry
- Radio
- Thermodynamics
- Aerodynamics
- Light and optics
- Simple laser communicator
- Make your own 3D pictures
- Making permanent rainbows.
- A solar powered marshmallow roaster
- Make a spectroscope from a CD.
- The impossible kaleidoscope
- Make a solar hotdog cooker
- Exploring invisible light
- A high resolution spectrograph.
- Time-lapse photography.
- High speed photography.
- Stacking photos for high depth of field.
- Biology
- Mathematics
- Computers and Electronics
Magnets and Magnetism
We have all played with magnets. A pair of magnets by itself makes a wonderful toy. Today's magnets are even better than the best ones I remember playing with as a child. At toy stores and Radio Shack you can get flexible magnetic strips of plastic that can be cut into shapes with scissors. You can also get cheap and brittle ceramic magnets, stronger Alnico magnets, and even the new super strong rare-earth magnets. These are made of neodymium-iron-boron or samarium-cobalt, and are very powerful. At the end of this section I will list some sources I have found for good or cheap (or good and cheap) magnets. Some particularly nice tiny ones can be found in our catalog. Through mail-order surplus houses you can get large neodymium-iron-boron magnets of incredible strength. For about five dollars each you can get magnets that will hold paperback books onto your refrigerator, or drag each other around a two-inch thick table, one on top of the table and one hidden underneath. I once entertained my guests and several waiters at a restaurant by mysteriously moving the stainless flatware around the table. People are not used to the effects of powerful magnets. They are amazed even when they can see what you are doing. Because of their high strength-to-weight ratios, neodymium-iron-boron magnets seem to be little affected by gravity. Small ones can be placed on either side of a nose and will stay there until the wearer laughs so hard they slide upwards against gravity and snap together. Temporary earrings are also popular. Handle larger magnets with care, since they will pinch hard enough to cause blisters if they are separated only by small bits of skin. They are also easily capable of erasing the magnetically stored information on credit cards, computer floppy disks, and cassette tapes, but magnetic storage in consumer items is becoming rare these days, and this is less of an issue than it used to be. If you are showing magnets to a very young person for the first time, there are several tricks you will not want to forget. Use some large cheap ceramic magnets from Radio Shack or a toy store so they will not be easily lost or swallowed. Show how they attract and repel each other. At Radio Shack you can get some donut-shaped magnets that can slide over a pencil. The child can stack several so they each repel, forming a magic spring. Put some cheap magnets into some clear plastic bags and drag the bags through some playground sand, or the sand at a beach. Show how the magnets attract the black iron ore out of the sand. Show how to sprinkle the ore on paper with a magnet underneath, to create arcing lines of powder that trace out the lines of force of the magnet. (The plastic bags keep the ore off the magnets, keeping them clean and making it easier to remove the powder. If the powder does get onto the magnets, use some sticky tape to remove it.) A magnetic compass placed near the arcs of powder will align itself with them, following their curve as you move it around. Several magnets under the paper will create interesting shapes in the iron ore above. Paper clips, pins, keychains, and other bits of ferrous metal will alter the shape of the ore as they become temporary magnets under the influence of the permanent magnets. Stroke a bit of iron or steel (such as a pin or a screwdriver) across the magnet. Show how this makes a new magnet, and how the new magnet can attract other bits of steel or the iron ore. By placing the new magnet under the paper, you can show with the ore that this magnet is not as powerful as the original. Heat up the pin or screwdriver to show how heat destroys the magnetism. Place two magnets under the paper, separated by a paper clip or other small bit of iron. Make sure each magnet touches the paper clip. Now when you sprinkle the ore on the paper, it forms a much smaller arc of powder. This shows the effect of a magnetic flux concentrator (the paper clip) which narrows (and thus strengthens) the force between the two magnets. These simple observations form the backdrop for the rest of this section. There we will show some effects that are not so simple or obvious, and yet are simple extensions of the properties of magnets that we all learned as children.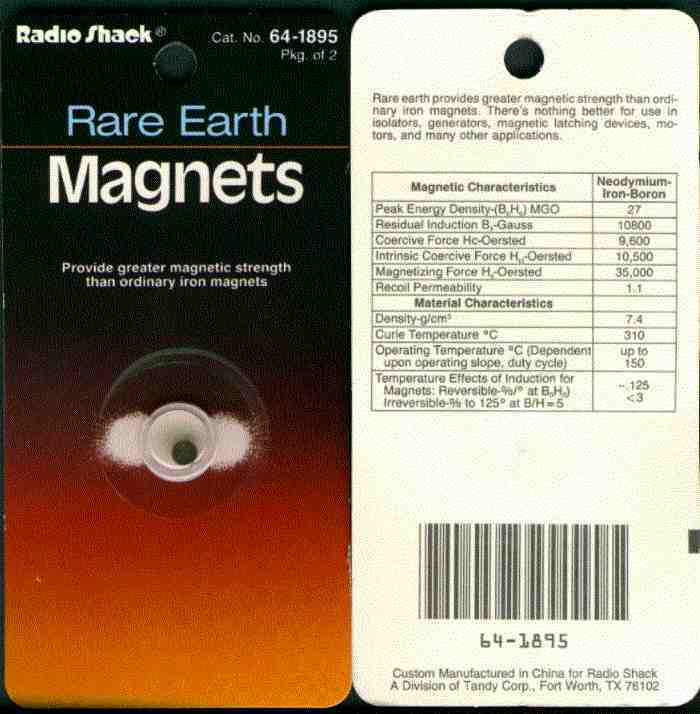
Experimenting with magnetorheological fluids
A magnetorheological fluid is a liquid that hardens near a magnet, and becomes liquid again when you remove the magnet. They are simple to make in your kitchen after a trip to a sandbox. In the introduction to this section I described how to mine iron ore out of the sand from playgrounds or the beach. You may want to spend a while at the beach, because we will need a good handful of ore. The ore that sticks to the magnets in the plastic bags has quite a bit of sand entrained in it. We can remove the sand by some additional refining. Make sure the ore is dry. Spread the ore out on a paper plate, and hold the bag with the magnet over the plate until a small amount of ore jumps up to the bag. Put this ore onto another plate, and continue until no more ore rises to the magnet in the bag. Don't get the bag too close to the plate, since there are many sand grains with ore stuck to them. We wish to keep only the ore that does not stick to grains of sand. The ore in the second plate should be visibly darker than what is left in the first plate. If you can see a lot of sand in the second plate, repeat the process, using a third plate. Put the ore into a small cup. Soft plastic cups work nicely. The cup should be small enough that the ore fills it at least a third of the way up. Add some vegetable oil to the ore, and stir with a plastic spoon, or another nonferrous object, such as a popsickle stick. Keep adding oil until you get a thin black paste. Now gently place a strong magnet on the side of the cup. It should stick to the side as it attracts the ore. The ore should become quite stiff. Tip the cup over another cup to let excess oil and ore pour off. What remains in the first cup is our magnetorheological fluid. We are now ready for the fun part. Hold the cup upright, and remove the magnet. Stir the liquid with the plastic spoon. It may be a little stiff at first, but will soon stir easily. Tip the cup a bit to the side, and bury the bowl of the spoon in the liquid. Now place the magnet on the side of the cup to stiffen the goop. The spoon will now stand upright when the cup is righted. The cup can even be inverted without losing any fluid, although a little oil may still drip out the first few times. Set the cup upright again, remove the magnet, and the solid mass slumps back into the cup, and the spoon falls over. Put some fluid into a plastic bag, and let a magnet stick to the side of the bag. Now you can form the fluid into shapes by pressing the bag. The fluid will act like clay, and hold its shape. When you remove the magnet, the shapes slump into puddles.Why does it do that?
Iron ore in oil reacts pretty much the way it reacts without the oil. Only one thing is really different. The oil allows the powder to slump more easily than it can when dry. This is because of its extra weight, its lubricating ability, its viscosity, and the fact that the ore is more buoyant in oil than in air. Saying that it behaves like dry ore doesn't really answer the question unless we know why dry ore acts the way it does. If we look very closely at the ore with a magnifying glass or a microscope, we will notice that the pieces are a little longer than they are wide. They look like small footballs. Shapes like this do interesting things in a magnetic field. Take a small iron nail in one hand, and a magnet in the other. Move the nail around the magnet, holding the nail loosely so it can move under the influence of the magnet. The nail will align itself with a bar magnet if you hold the two of them parallel to each other. As the nail moves toward one pole of the magnet, it will rotate so the point of the nail points toward the pole. Eventually, when the nail is above the pole, it will point straight at the pole. There are two ways to think about what is happening. Pretend the attraction of the magnet is the attraction of the Earth, and the nail is a domino standing up on its end. A slight push makes the domino lie flat, and it takes a larger push to make it stand up straight again. We say that the domino has more potential energy when it is standing up than it has when it is lying down. There is a tendency for dominos to lose this energy by lying down. They have much less of a tendency to spontaneously gain energy and stand up by themselves. The nail tends to "fall down" so that it aligns with the magnetic lines of force that surround the magnet. To illustrate the second way of thinking about the nail and the magnet we need a second nail. Hold the first nail parallel to the magnet, about half an inch to the right. Bring the second nail parallel to the first nail, a little to its right. We might expect the magnet to attract the second nail, just like the first nail. Instead we find that the two nails are repelling one another. If we lower the second nail so its top is near the bottom of the first nail, it now attracts the first nail. The nails seem to have become magnets themselves while in the presence of the bar magnet. Their poles repel when they are parallel, and attract when they align vertically. If the bar magnet has its north pole facing away from you, the nails will have their south poles facing away from you. The nails attract the magnet because unlike poles attract each other. The nails repel each other because like poles repel each other. It is now easy to see why the nail follows the magnetic lines of force as it moves around the magnet. Its north pole points toward the magnet's south pole. Its south pole points to the magnet's north pole. When the nail is beside the magnet, it is parallel because the attractions are equal. When it is closer to the magnet's north pole, the nail's south pole attracts and the north pole repels, and it rotates. Magnets repel one another when they are side by side. They attract one another when they are end to end. The natural state of a collection of magnets will thus be a string of them stuck end to end. If there are two strings next to each another, they will stagger so the poles of one string will be next to the centers of the other. Like poles are thus as far apart as possible. The strings will still repel from one another slightly. This is exactly the behavior of grains of iron ore sprinkled on paper above a magnet. When a magnet is placed on the side of a jar of iron ore powder, the powder arranges itself into strings. Each grain of powder becomes a magnet and attracts the opposite pole if its neighbor. The strings thus formed repel each another, and the powder expands. If the powder has been mixed with oil, the oil wicks into the spaces created by the expansion, and sticks there by surface tension. The result is a dry appearing solid that does not leak oil. To learn more about magnets, skip ahead to the scientific part.Building a magnetic heat engine.
I originally built this toy using a Canadian nickel coin. Canadian nickels are made of pure nickel, unlike U.S. nickels, which contain so much copper that they are not magnetic. You can build the toy with the nickel or with the Radio Shack rare-earth magnet. The rare earth magnet will work a little better because it loses its magnetic properties at a lower temperature, and thus the toy can use a candle instead of an alcohol burner for its heat source. Some particularly nice tiny rare-earth magnets can be found in our catalog. This heat engine is very simple. We suspend a small piece of magnetic material at the end of a pendulum. A large magnet is placed near the pendulum, so that the small piece of material sticks to the large magnet. The magnet should be close enough that the material never rests at the bottom of the pendulum's swing, but instead jumps up to the magnet. A candle is placed under the material, so the flame just touches it. The candle flame will heat up the magnetic material until it loses its
ability to be magnetized.
Gravity will then pull it away from the magnet (and thus away from the flame).
The magnetic material will cool down a little bit once it is away from
the flame, and regain its ability to stick to the magnet.
The magnet will then pull it up into the flame, and the whole process repeats.
All the parts can be found at Radio Shack, but if you want to build the
engine using a Canadian nickel, any hardware store will have the other
parts you need.
You will need some copper or brass wire, a large ceramic magnet (the cheap
kind that Radio Shack sells for about a dollar), and a candle.
We want the pendulum to swing back and forth only, so we use two wires to
hold it up.
Cut about a foot of wire and wrap the center of the wire around the large magnet.
Then form the two ends into small loops and bend them up to form the
support for the pendulum.
If you are using the rare-earth magnet for the pendulum's weight, it
helps at this point to demagnetize it by holding it in a candle flame.
You can stick it onto a coat hanger and hold the magnet in the flame
until it falls off.
This will prevent the magnet from jumping onto the large ceramic magnet
while we adjust the pendulum.
Wrap another foot of wire around the nickel or the rare-earth magnet
that will form the weight for the pendulum.
Form the two ends of the wire into loops that slip into the loops of
the pendulum support.
Make sure that the pendulum weight is just close enough to the magnet
that it rises to it when the pendulum is vertical.
The wires of the pendulum and its support should be long enough that
the weight can fall away from the flame and hang vertically when it is
demagnetized.
With the pendulum stuck to the large magnet, position a short (lighted)
candle so that the flame just touches the weight.
You may need to shield the flame from drafts so it remains steady.
The flame will heat the rare-earth alloy until it loses its ability to
stick to the large ceramic magnet.
It will then fall away, and swing a few times as it cools.
When it is cool enough to be magnetized again, it will rise and stick
to the magnet, where the flame will again heat it up.
If the weight still touches the flame when it has fallen away from the
magnet, adjust the pendulum's supports a little so that the weight rests
a little farther away.
If the weight is so far away that the magnet cannot pull it back up once it
is magnetized, adjust the supports to bring it closer.
Be careful when adjusting the supports, since they may be quite hot.
Also be careful to move the candle so as not to burn yourself on the candle
flame.
When the engine is adjusted just right, it will settle down to a predictable
swing, often taking only one swing to cool enough to stick to the magnet again.
It will run as long as the candle burns.
If you have chosen to use the Canadian nickel, you will need a heat source
better than the candle.
A small alcohol lamp or fondue pot burner will do nicely.
You may have to make the pendulum support wires longer to make room for
the lamp.
The candle flame will heat up the magnetic material until it loses its
ability to be magnetized.
Gravity will then pull it away from the magnet (and thus away from the flame).
The magnetic material will cool down a little bit once it is away from
the flame, and regain its ability to stick to the magnet.
The magnet will then pull it up into the flame, and the whole process repeats.
All the parts can be found at Radio Shack, but if you want to build the
engine using a Canadian nickel, any hardware store will have the other
parts you need.
You will need some copper or brass wire, a large ceramic magnet (the cheap
kind that Radio Shack sells for about a dollar), and a candle.
We want the pendulum to swing back and forth only, so we use two wires to
hold it up.
Cut about a foot of wire and wrap the center of the wire around the large magnet.
Then form the two ends into small loops and bend them up to form the
support for the pendulum.
If you are using the rare-earth magnet for the pendulum's weight, it
helps at this point to demagnetize it by holding it in a candle flame.
You can stick it onto a coat hanger and hold the magnet in the flame
until it falls off.
This will prevent the magnet from jumping onto the large ceramic magnet
while we adjust the pendulum.
Wrap another foot of wire around the nickel or the rare-earth magnet
that will form the weight for the pendulum.
Form the two ends of the wire into loops that slip into the loops of
the pendulum support.
Make sure that the pendulum weight is just close enough to the magnet
that it rises to it when the pendulum is vertical.
The wires of the pendulum and its support should be long enough that
the weight can fall away from the flame and hang vertically when it is
demagnetized.
With the pendulum stuck to the large magnet, position a short (lighted)
candle so that the flame just touches the weight.
You may need to shield the flame from drafts so it remains steady.
The flame will heat the rare-earth alloy until it loses its ability to
stick to the large ceramic magnet.
It will then fall away, and swing a few times as it cools.
When it is cool enough to be magnetized again, it will rise and stick
to the magnet, where the flame will again heat it up.
If the weight still touches the flame when it has fallen away from the
magnet, adjust the pendulum's supports a little so that the weight rests
a little farther away.
If the weight is so far away that the magnet cannot pull it back up once it
is magnetized, adjust the supports to bring it closer.
Be careful when adjusting the supports, since they may be quite hot.
Also be careful to move the candle so as not to burn yourself on the candle
flame.
When the engine is adjusted just right, it will settle down to a predictable
swing, often taking only one swing to cool enough to stick to the magnet again.
It will run as long as the candle burns.
If you have chosen to use the Canadian nickel, you will need a heat source
better than the candle.
A small alcohol lamp or fondue pot burner will do nicely.
You may have to make the pendulum support wires longer to make room for
the lamp.
Why does it do that?
The heat engine works because of something called the Curie effect. The Curie effect describes how a magnetic material loses its ability to stick to a magnet when heated above a certain temperature. This temperature is called the Curie temperature, and varies with the material. The Curie temperature for iron is about eight hundred degrees Celsius. The Curie temperature for the inexpensive ceramic magnets is also quite high, which is why the candle flame or even the alcohol lamp does not affect them. The Curie temperature for the Canadian nickel is lower, about 631 degrees Celsius. This temperature is within range of the alcohol lamp, and almost possible with the candle. The Curie temperature for the Radio Shack rare earth magnets is 310 degrees Celsius, and the candle can reach this easily (not only because of the lower Curie temperature, but because the magnets are so much smaller than the nickel that they heat up faster, and have less unheated surface area). I have tried Ronson lighter flints, which also have a Curie temperature within easy range of a candle. The combination of their small size and low Curie point makes them stay above their Curie point too long. The magnet and the flame have to be close together for the engine to work. When the flints are close enough to the magnet to overcome gravity, they are close enough to the flame to rise above their Curie point. Other designs have been tried successfully, involving placing the flints on a wheel and using a soldering iron as a heat source. A magnifying glass could be used to focus the sun on the flint when it is touching the magnet, without heating the flint when it falls away. Experiment with other designs. There are many possibilities. Here are the construction details.
More about magnets (the scientific part).
It is fairly simple to think about the nails becoming magnets and aligning themselves in the magnetic field. It is also fairly simple to think about them as dominos that "fall" in line with the field. But which is the real explanation, and how would either of them happen? Both explanations are correct. Magnetic fields exist because somewhere electrons are moving. In the nails, the electrons in the iron atoms are orbiting the nucleus, and each electron is also spinning on its axis. Most materials are not strongly magnetic, because their magnetic poles (caused by spinning electron) are either randomly oriented, or they pair in opposite directions. If the electrons in an atom (or a molecule) create equal numbers of north and south magnetic poles that cancel each other out, the atom has no magnetic poles. If you bring a magnet near such an atom, the magnetic field causes the electrons in the atom to move. Moving electrons create a magnetic field, and the field they create is opposite to the original magnetic field. The atoms move away from the magnet. Materials that act this way are called diamagnetic materials. The effect is very weak, even in bismuth, which is the most diamagnetic material. If the electrons in an atom do not create canceling magnets, the atom has a north and a south pole. Normal room temperature causes these atoms to bounce around, and their magnetic poles are randomly oriented. If the atoms are inside a magnetic field, some of them will align with the field. Others will have too much energy and will still bounce around. The amount of energy depends on the temperature, so the colder the atoms are, the more of them will align with the field. Materials that act in this way are called paramagnetic materials. Paramagnetic materials are attracted to magnets, but the effect is weak unless the temperature is very low. Paramagnetic materials also exhibit diamagnetic effects, but the paramagnetic effect is stronger unless the temperature is very high. Aluminum and platinum are paramagnetic. In four elements (iron, nickel, cobalt, and gadolinium) the magnetic poles of
the atoms stay lined up even at temperatures that thoroughly randomize the
poles of other elements.
These elements are called ferromagnetic.
In the four ferromagnetic elements the magnetic effects are caused by the
electrons in the inner orbits.
They would align with their poles opposite except for a principle of quantum
mechanics called the Pauli exclusion principle.
This principle (very loosely interpreted) says that electrons cannot occupy
the same space unless they have opposite spins (which means opposite magnetic
poles).
Two atoms in an element like iron might share an outer electron.
This electron will try to align the poles of the inner electrons to be opposite
the outer electron.
This makes the inner electrons have the same orientation.
The inner electrons are thus all aligned the same way, and contribute the
magnetic field.
In four elements (iron, nickel, cobalt, and gadolinium) the magnetic poles of
the atoms stay lined up even at temperatures that thoroughly randomize the
poles of other elements.
These elements are called ferromagnetic.
In the four ferromagnetic elements the magnetic effects are caused by the
electrons in the inner orbits.
They would align with their poles opposite except for a principle of quantum
mechanics called the Pauli exclusion principle.
This principle (very loosely interpreted) says that electrons cannot occupy
the same space unless they have opposite spins (which means opposite magnetic
poles).
Two atoms in an element like iron might share an outer electron.
This electron will try to align the poles of the inner electrons to be opposite
the outer electron.
This makes the inner electrons have the same orientation.
The inner electrons are thus all aligned the same way, and contribute the
magnetic field.
 In many paramagnetic materials, the atoms pair up with their north and south
poles in opposite directions, canceling each other out.
These materials are called antiferromagnetic.
Chromium and manganese are antiferromagnetic.
Some materials, called ferrites, are similar to antiferromagnetic
materials, but consist of two different magnetic components, one of
which is stronger than the other.
In many paramagnetic materials, the atoms pair up with their north and south
poles in opposite directions, canceling each other out.
These materials are called antiferromagnetic.
Chromium and manganese are antiferromagnetic.
Some materials, called ferrites, are similar to antiferromagnetic
materials, but consist of two different magnetic components, one of
which is stronger than the other.
 This makes them act like ferromagnetic materials, and they are attracted
to magnets.
The iron ore we have been using is an example of a ferrite.
It is a mineral called magnetite, and the natural magnet lodestone is
made out of it.
The name for this configuration is ferrimagnetism, after the ferrites.
Ferrites find many uses in electronics, because they are magnetic, but
do not conduct electricity like iron does.
Just as electricity travels through some materials better than others,
magnetism travels with ease through some materials, and has more difficulty
traveling through others.
The ability of a material to conduct magnetic flux is called the relative
permeability of the material.
It is measured relative to the permeability of air, which is assigned a
permeability of one.
Iron and steel have relative permeabilities between 100 and 9,000.
Ferrites have relative permeabilities between 50 and 3,000.
The relative permeability of a material can be thought of as the ease with
which a material can be magnetized. The higher the relative permeability,
the easier it is to magnetize a material.
The lines of force of a magnet, as a group, make up the magnetic flux. The
stronger the magnet, the more lines of force it has, and thus the more
magnetic flux it has.
A typical household magnet has between 100 and 1,000 lines of force.
One line of force is called a maxwell.
Materials with high relative permeability allow more lines of flux inside
them than does the air around them.
The flux is thus concentrated in the material.
The measure of concentration of flux, measured in lines of force per square
centimeter, is the gauss.
One gauss is one line per square centimeter.
The earth's magnetic field measures about .2 gauss. The superconducting
electromagnets used in magnetic resonance imaging range from 5,000 to 15,000
gauss.
When you held the nail close to the magnet, the lines of force of the magnet
flowed more easily through the nail than through the air.
Just as water seeks the path of least resistance, the magnetic flux sought
out the highest relative permeability.
Because there would be less resistance if the flux flowed through the
entire nail lengthwise rather than through a small part of it crosswise,
there is a force on the nail that tends to line it up with the lines of
force of the magnet.
This is the force that makes it "fall down" parallel to the lines of force.
At the same time, the nail is magnetized, and its poles are attracted to
the opposite poles of the magnet.
This makes them act like ferromagnetic materials, and they are attracted
to magnets.
The iron ore we have been using is an example of a ferrite.
It is a mineral called magnetite, and the natural magnet lodestone is
made out of it.
The name for this configuration is ferrimagnetism, after the ferrites.
Ferrites find many uses in electronics, because they are magnetic, but
do not conduct electricity like iron does.
Just as electricity travels through some materials better than others,
magnetism travels with ease through some materials, and has more difficulty
traveling through others.
The ability of a material to conduct magnetic flux is called the relative
permeability of the material.
It is measured relative to the permeability of air, which is assigned a
permeability of one.
Iron and steel have relative permeabilities between 100 and 9,000.
Ferrites have relative permeabilities between 50 and 3,000.
The relative permeability of a material can be thought of as the ease with
which a material can be magnetized. The higher the relative permeability,
the easier it is to magnetize a material.
The lines of force of a magnet, as a group, make up the magnetic flux. The
stronger the magnet, the more lines of force it has, and thus the more
magnetic flux it has.
A typical household magnet has between 100 and 1,000 lines of force.
One line of force is called a maxwell.
Materials with high relative permeability allow more lines of flux inside
them than does the air around them.
The flux is thus concentrated in the material.
The measure of concentration of flux, measured in lines of force per square
centimeter, is the gauss.
One gauss is one line per square centimeter.
The earth's magnetic field measures about .2 gauss. The superconducting
electromagnets used in magnetic resonance imaging range from 5,000 to 15,000
gauss.
When you held the nail close to the magnet, the lines of force of the magnet
flowed more easily through the nail than through the air.
Just as water seeks the path of least resistance, the magnetic flux sought
out the highest relative permeability.
Because there would be less resistance if the flux flowed through the
entire nail lengthwise rather than through a small part of it crosswise,
there is a force on the nail that tends to line it up with the lines of
force of the magnet.
This is the force that makes it "fall down" parallel to the lines of force.
At the same time, the nail is magnetized, and its poles are attracted to
the opposite poles of the magnet.
Measures used in permanent magnets.
What makes a good permanent magnet? We want a magnet that has a strongly concentrated magnetic field. We also want a magnet that will stay magnetized. To understand how we measure a permanent magnet's strength and permanence, it is helpful to picture how we make a magnet. We start with a piece of iron or another ferromagnetic material. We will assume that it is not magnetized when we find it. To magnetize if, we place it in a magnetic field created by another magnet. We will place ours in a field created by an electromagnet, so we can vary the strength of the field and see what happens to the iron. When the field strength is small, the number of lines of force concentrated in the iron is also small. As the field strength rises, more of the tiny magnets in the iron (called domains) align with the external field. The number of lines of force in the iron rises with the field strength. This continues until all the magnets in the iron line up with the external field. At this point we say the iron is saturated. It cannot hold any more lines of force. As we raise the external field strength, we see no further increase in the number of lines of force in the iron. Suppose we now start reducing the external field strength. The heat inside the iron at room temperature jostles the tiny magnetic domains inside, and some of them readjust so they do not align with the external field. But some domains stay stuck, aligned with the field. When we completely remove the external field, these stuck domains are left, and we have a permanent magnet. Suppose we now reverse the external magnetic field, and start gradually increasing its strength. At first the stuck domains resist turning around to align with the external field, and the number of lines of force concentrated in the iron changes only slowly. As the external field gradually overwhelms these stuck domains, they flip over. Eventually the external field is strong enough to flip them all over, and the iron is saturated again (but the poles are now reversed). If we graph the number of lines of force in the iron against the strength of the external magnetic field, we get a graph that looks like a fat S. We call the magnetic flux density that remains in the iron when we remove
the external field the remanence.
We call the strength of the external field needed to demagnetize the iron
the coercive force.
What we want in a permanent magnet is a high remanence (measured in gauss)
and a high coercive force (measured in oersteds).
Radio Shack sells small magnets made from a neodymium-iron-boron alloy that
have very high values for remanence and coercivity.
The package lists the remanence (which they call by its other name, residual
induction) of 10,800 gauss.
The coercivity is 9,600 oersteds.
Another measurement used to describe permanent magnets is the strength of
the external field when the material is saturated multiplied by the number
of lines of flux in the material at saturation.
This number is the energy product, or the peak energy density, and is
measured in gauss oersteds.
The Radio Shack magnets have a value of 27 million gauss oersteds.
These magnets could be dangerous if they weren't so small.
They are less than a quarter of an inch in diameter and about a tenth of
an inch high.
For more information on measuring magnets, see
Calculating the strength of a magnet.
Next: Suspending a magnet in mid-air.
We call the magnetic flux density that remains in the iron when we remove
the external field the remanence.
We call the strength of the external field needed to demagnetize the iron
the coercive force.
What we want in a permanent magnet is a high remanence (measured in gauss)
and a high coercive force (measured in oersteds).
Radio Shack sells small magnets made from a neodymium-iron-boron alloy that
have very high values for remanence and coercivity.
The package lists the remanence (which they call by its other name, residual
induction) of 10,800 gauss.
The coercivity is 9,600 oersteds.
Another measurement used to describe permanent magnets is the strength of
the external field when the material is saturated multiplied by the number
of lines of flux in the material at saturation.
This number is the energy product, or the peak energy density, and is
measured in gauss oersteds.
The Radio Shack magnets have a value of 27 million gauss oersteds.
These magnets could be dangerous if they weren't so small.
They are less than a quarter of an inch in diameter and about a tenth of
an inch high.
For more information on measuring magnets, see
Calculating the strength of a magnet.
Next: Suspending a magnet in mid-air.
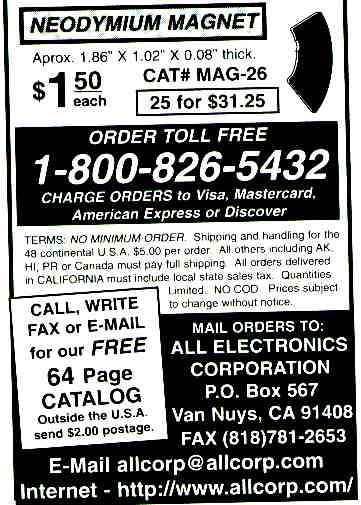
Sources for magnets
Because some of our readers were having difficulty finding good sources of small neodymium-Iron-Boron super magnets, we have obtained a quantity of some very nice gold-plated tiny magnets for use in the Curie-effect heat engine and the magnetic suspension project. These can be found in our online catalog at:The Scitoys Catalog For more information on magnetism, see the Recommended Reading section. Del.icio.us
- Science Toys
- Magnetism
- Electromagnetism
- Electrochemistry
- Radio
- Thermodynamics
- Aerodynamics
- Light and optics
- Simple laser communicator
- Make your own 3D pictures
- Making permanent rainbows.
- A solar powered marshmallow roaster
- Make a spectroscope from a CD.
- The impossible kaleidoscope
- Make a solar hotdog cooker
- Exploring invisible light
- A high resolution spectrograph.
- Time-lapse photography.
- High speed photography.
- Stacking photos for high depth of field.
- Biology
- Mathematics
- Computers and Electronics
Some of my other web sites:

Send mail to Simon Quellen Field via sfield@scitoys.com